This guide covers the myhrtoolkit Leavers module and includes the following areas:
User permissions are largely unchanged; Managers with previous access, will still be able to access the Leavers module (for the team they manage). New managers will not have access to Leavers by default.
Permissions for Leavers is now managed via Config > Access rights > User permissions.
There is a permission called “Configure individual retention policy”. This is disabled by default but can be enabled via Config > Access rights > User permissions.
Note – More information relating to this permission can be found in the “Data Retention Policy” section of this guide.
To set an employee as a leaver, search for them using the search bar from Management > Leavers > Set leaver.
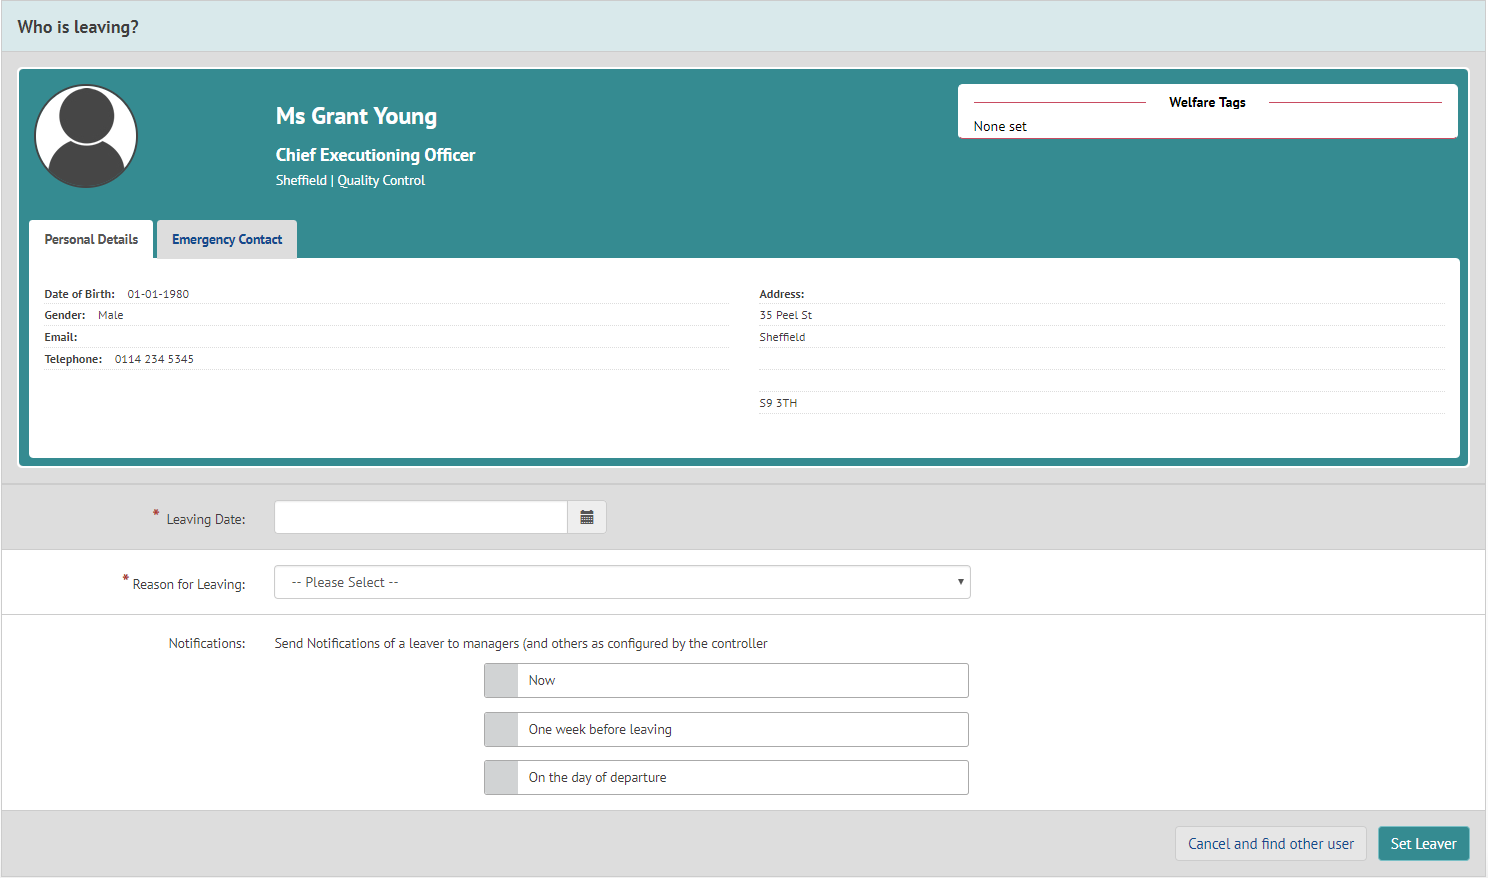
Once the user is selected, you’ll be presented with their personal and emergency contact information and be asked to confirm that your selection is correct.
Following this, you’ll be asked to enter their leaving date, reason for leaving and if/when you’d like a notification to be sent – see image below.
Lastly, once this information is submitted, you’ll be shown the User’s leaving summary. You can print this using the “Print” button at the top right.
When an employee’s leaving date has been set, they will be placed into the Archive which can be accessed via Management> Leavers > Archive.
When you view the Leavers Archive, you will first see a table of information. To the right of each User record is an “Actions” button allowing the following:

Note – There may be times when it is useful to be able to review an employee’s record after they have left, for instance if there is a dispute about holidays taken.
To see an User’s record after they have been marked as a leaver, use the Employee Files option from the Actions menu against their name. The standard Employee Files page will be shown, with the normal tabs available to see Holidays, Absence, Training, etc.
Remember that an employee’s data will no longer be available to view in this manner after it has been Processed.
This refers to how a leaver’s data is handled based on the organisation’s Data Retention Policy; there are three options:
Note
Once processed, you can no longer reinstate a User but can still view their remaining information.
More information on this can be found in the Data Retention Policy section of the guide.
In the Processed leavers area is a comprehensive User table – see image below. To the right of each User record is an “Actions” button, allowing you to access the following:

An email is sent to all controllers seven days before the processing of leavers. The email highlights which users are leaving, and the date they will be processed.
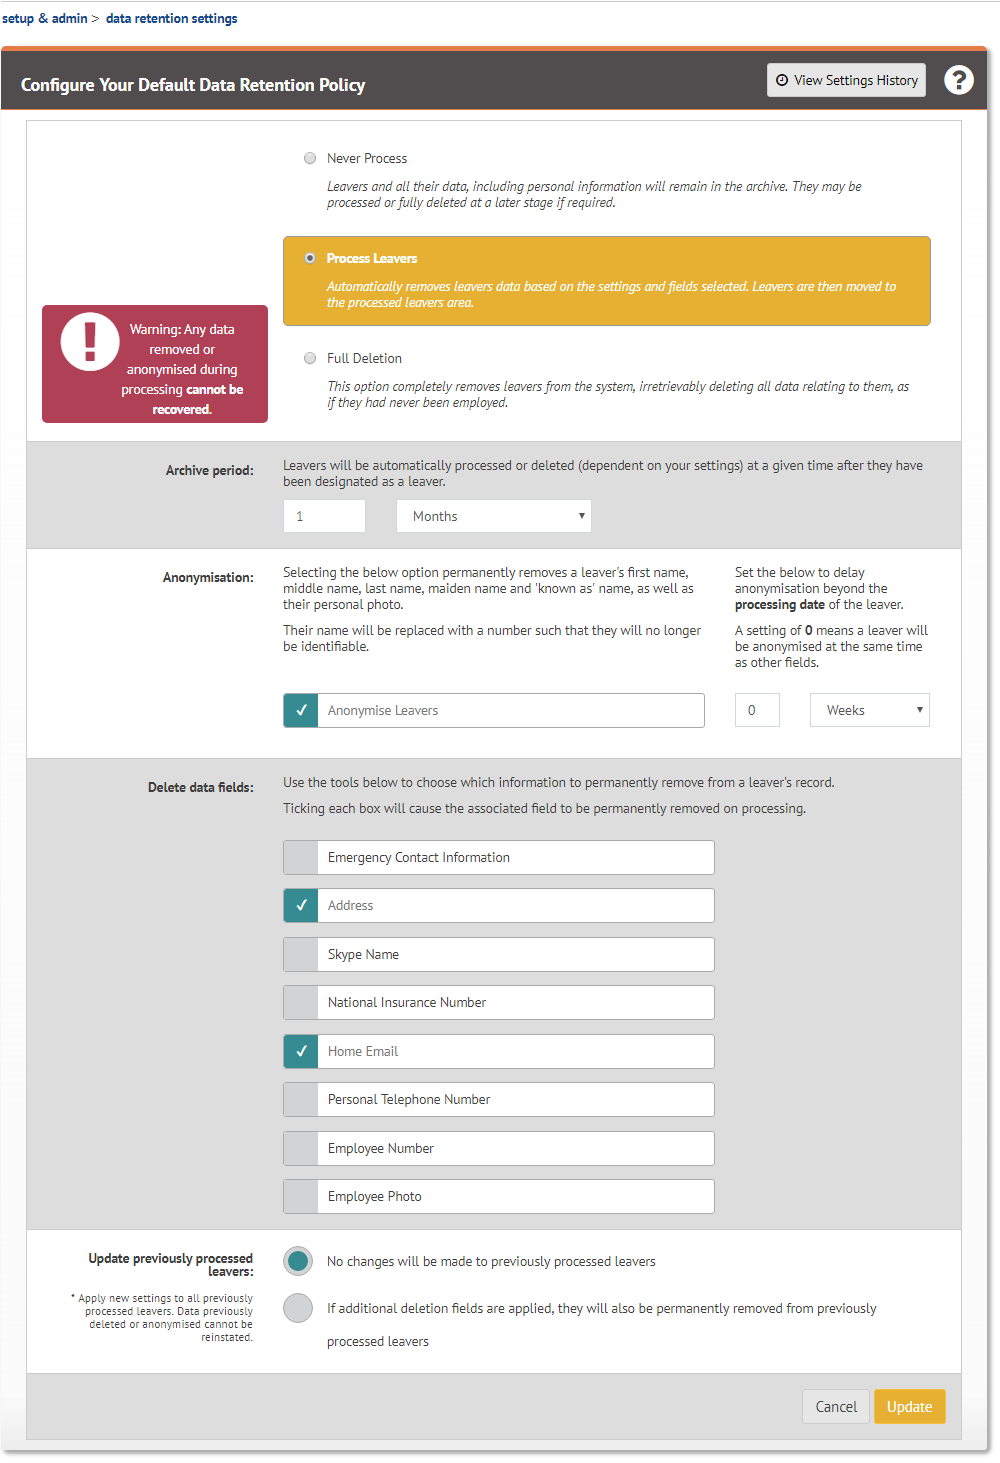
The system allows the creation of an organisation wide policy to manage the retention / deletion of ex-Users’ personal information.
This functionality can be accessed by Controllers via Config > System > Data retention.
The default setting is to never process Leavers, thereby retaining all leavers’ information in the archive area indefinitely. However, this can be changed to either process the Leaver (strip out data fields) or to fully delete the User and all their data – see the Processed leavers area section of this document.
Ticking the option boxes causes the removal of the specified personal information, including anonymising the record when processed. From this section you can configure:
Note – The removal of personal information is permanent and cannot be reversed.
A Controller can amend the Data Retention policy at any time.
Whenever additional deletions are set,
This causes a Leavers record and all associated data to be fully removed as per the timing set in the Data Retention Policy.
It will no longer be viewable, and the Leaver will no longer appear in any report calculations.
Note – This process cannot be reversed
Managers can be given permission to set their own Individual Data Retention Settings for Leavers they manage via Config > Access rights > User permissions.
In the Archive or Processed Leavers sections, clicking the “Actions” button and selecting “Data Retention Settings” allows configuration of that individual Leavers settings.
The options follow the organisation-wide Data Retention Policy where ticking the option boxes causes the removal of the specified personal information, but with the ability to process a Leaver immediately. If this is set to yes, it will override the 7-day grace period and enact the processing straight away.
If a Leaver is processed via Individual Data Retention settings, they will be excluded from any subsequent update made via the organisation wide Data Retention Policy. If required they can be switched back to the company-wide policy, however, this will not replace any previously deleted information.
Note – Once data fields have been removed from a leaver's record using the Individual Data Retention Settings, they can no longer be retrieved in the future.
When users are set as leavers, their Bank Holiday setting needs to be taken in to account in determining their remaining holiday entitlement. This is controlled via a setting in Config > System > Holiday > Include final leavers entitlement.
If this option is selected any untaken bank holidays will be included in the pro-rated leavers entitlement calculation.
Note – If you activate this feature, you must ensure that any leavers allocated to Locations other than ‘England & Wales’, have all relevant public holidays entered for that Location. You can check and edit at Config > System > Holiday > International statutory holidays.

 Holiday Planner
 Absence Management
 Performance Management
 Staff Management
 Document Management
 Reporting
 Health and Safety Management
 Task Management
 Security Centre
 Self Service
 Mobile