This guide will show you how you can import information into your new myhrtoolkit HR system via four specially configured spreadsheets. Saving a lot of time, this will considerably speed up your setup.
The available uploads are:
| Name |
Location |
What it uploads |
| Personal data |
Import employee data from Excel |
All personal details – names, address, email, tel nos, dob, NI, location, dept, job title, and more |
| Emergency contact |
Emergency contact |
Emergency contact details for each user |
| Holiday setup |
Employee holiday dates |
Previous and future holiday dates |
| Sickness absence |
Sickness absence dates |
Previous sickness records |
Each of these four upload areas are explained below.
- Uploading Personal details
Before you populate your spreadsheet, make sure you have created your organisation’s locations, departments and job titles. The system will generate ID’s for these elements so that you can use ID’s in place of names in the spreadsheet.
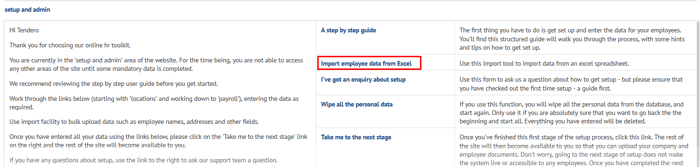
Once that’s done, you can now click on the ‘Import employee data from excel‘ (image above) followed by Default spreadsheet (image below) to download the a copy of the spreadsheet that you will need to populate.

- DO NOT change the layout of this spreadsheet by adding, removing or moving columns out of their original order.
- DO NOT amend values in the User ID for existing records. Leave the User ID field blank for new employees.
When completed to your satisfaction, save the spreadsheet to a CSV format and import your data via the upload section at the bottom of the instruction page. The system will perform a number of validation tasks before uploading your information.
- Uploading Emergency Contact information
Go to Emergency contact and find the link that says Click here in the the description for “Emergency contact.” You will find the default spreadsheet that you will need to download and populate. The rest of the process is similar to the employee upload spreadsheet.
- Uploading Employee Holiday and Absence Data
Using this feature you can import data you already have into the system. It is currently only available in Initial Setup.
- From the set up screen, click on the ‘click here‘ link – either in employee holiday dates (as below) or sickness absence dates – the process is the same.

- Save the spreadsheet onto your computer – somewhere accessible, e.g. ‘my documents.’ The default spreadsheet is an empty spreadsheet with the column headings prepared.The columns in the spreadsheet are:[ User ID ] [ First Name ] [ Surname ] [ From ] [ To ] [ Time Off ]
- Cut and paste your data into the spreadsheet. You can leave columns empty, but you cannot create new headings. Please do not remove or change the numbers in the ‘User Id’ column.
- Make sure all dates are in the format dd/mm/yyyy. You must use exactly this format, with slashes, and all ‘years’ must have four digits (so don’t put ’15/01/14′, it needs to say ’15/01/2014′)
- The amount of time off should be entered as a number, ie for 3 days off or 3 hours off please simply enter the number: 3
- Save the spreadsheet in ‘CSV’ format. To do this, when you save the document you need to select ‘save as’ and then use the ‘save as type’ pull-down selector to choose CSV. It might also say ‘comma delimited’
- Having saved the spreadsheet on your computer, click on the ‘Browse‘ button to select the spreadsheet and then click on ‘Upload employee file‘ and follow the instructions.
Related guides
How to import data (after setup)
How to import holiday and absence data (after setup)


 Holiday Planner
 Absence Management
 Performance Management
 Staff Management
 Document Management
 Reporting
 Health and Safety Management
 Task Management
 Security Centre
 Self Service
 Mobile